> For the complete documentation index, see [llms.txt](https://docs.pulselabs.ai/llms.txt). Markdown versions of documentation pages are available by appending `.md` to page URLs; this page is available as [Markdown](https://docs.pulselabs.ai/data-capture-tools/evaluations-task-based-research.md).
# Evaluations
### What are evaluations in Pulse Labs?
Evaluations are unmoderated assignments (e.g., watching a participant’s reactions and commentary during a task). Unlike interviews (which are live and moderated), evaluations scale easily — dozens of participants can complete them simultaneously without a researcher present.
You define a set of instructions and tasks, participants complete them on their own time with the ability to record their screen and/or camera, and you review the recordings afterward.
Evaluations are ideal for:
* Usability and concept testing
* Discovery and validation — product, audience, features
* Competitive benchmarking
* Longitudinal studies and journey mapping
* Rolling research
* B2B and B2C
### Creating an evaluation
From your project's Data tab, select **Add Capture Series** and then select **Evaluation**. The creation flow has four steps.
#### Step 1: Session Details
* **Evaluation name** — A descriptive name for this evaluation (shown to participants)
* **Estimated Session Duration** — Expected time commitment from your participants (shown to participants)
#### Step 2: Device Selection
Choose which device type participants should use:
* **Desktop** — Participants complete evaluations on a personal computer or laptop
* **Mobile** — Participants complete evaluations on a phone or tablet
* **Any device** — Participants choose their device
Device selection affects what recording options are available and how activities are presented.
#### Step 3: Data capture options
You can enable either Screenshare or Video or both. For most evaluations, screen + video gives the richest data.
Note: Audio is not optional for either method. If a participant doesn’t enable the microphone, then they can’t submit their submission.
* **Screenshare** — Captures the participant's screen and audio as they complete activities
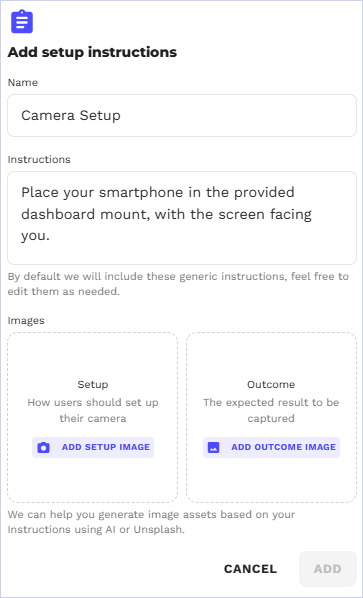
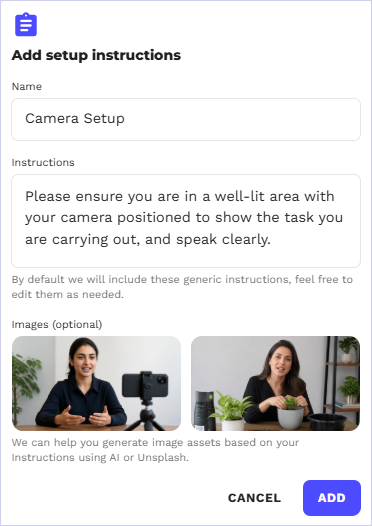
* **Video** — Captures the participant's native camera and microphone (for reactions and think-aloud commentary). For video, you will be asked to include additional setup instructions.
**Images (optional)**
If you would like to add images to help participants understand how to set up their camera and achieve the expected results, you can include **Setup** and **Outcome** images in the Add setup instructions panel. You can generate an AI image, search Unsplash Images, or upload your own image.
#### Step 4: Setup and Launch
Review your configuration. You can either:
* **Launch now** — Complete your evaluation setup and send to participants immediately
* **Save as Draft** — Come back to add tasks and/or instructions and send to participants later
### Designing an evaluation
When designing an evaluation, include one or more tasks for participants to complete. You have the option to include instructions for additional clarity.
An evaluation is meant to be completed in a single session. Consider creating multiple evaluations when you require participants to complete tasks over multiple sessions or if you anticipate participants taking a break and coming back to a new set of tasks.
#### Adding steps
On the Create Evaluation module, you will define the sequence participants will follow. A step can be a task or an instruction.
#### Adding tasks
* **Title** — A short name (e.g., "Find the pricing page")
* **Description** — What the participant should do. Be specific enough that they know the goal, but not so specific that you dictate the path.
#### Adding instructions
On the Create Evaluation module, you can optionally add instructions to help participants understand the tasks better or provide additional guidance. These instructions appear as popups that the participant must close before they can continue with the next task. You may add instructions between any tasks and place multiple instructions one after another if needed.
#### Step flow
Steps are presented to participants in order. You can reorder steps by dragging them in the steps list. Participants work through them sequentially, recording their response for each one.
#### Previewing your evaluation
You can preview your evaluation in two ways. Use the password-protected **Preview Link** to test your evaluation as a participant would experience it. This preview link is accessed from the Data Capture Settings on the Evaluation dashboard.
You can also use the **Preview** tab when setting up your Evaluation which supports:
* **Desktop view** — Full-width layout
* **Mobile view** — Narrow layout simulating a phone screen
* **Full interactivity** — Complete the tasks as participants will be asked to do so
Previewing your Evaluation highlights any issues like missing instructions or unclear task flows.
**Note:** An evaluation preview does not show actual data captures.
#### Good Task Design
* **Be specific about the goal, not the method** — "Find a flight from New York to London for next Friday" is better than "Using the search bar, enter New York and then select London..."
* **Keep tasks independent** — Each task should be completable on its own without relying on the outcome of a previous task.
* **Use realistic scenarios** — Frame activities and tasks as things a real user would actually want to do.
### Evaluation post-session follow-ups
Post-session follow-ups are essentially follow-up questions or requests for additional feedback. Note that only tasks, not instructions, can have post-session questions. You can attach follow-up questions to your evaluation to collect structured feedback alongside the behavioral recording.
**Note:** The identical set of follow-up questions are asked for each task. For example: if your evaluation included two tasks, and your follow-up questions included:
1 - Overall, how easy or difficult was it to complete this task?
2 - How much effort did it take to complete this task?
3 - What additional feedback do you have about this task?
This set of questions would be asked for both tasks.
#### Create a post-session follow-up
You can create your own custom set of questions or browse a collection of post-session follow-up templates — pre-built questions for common UX metrics.
* **Workspace templates** — Created by your team for reuse across projects
* **Custom follow-ups** — Build your own follow-up questions from scratch which can be used once or saved as a template for future use.
Follow-up questions for evaluations are built and customized using the same survey builder used for the survey data capture method.
### Evaluation delivery
Before launching your evaluation, you have the opportunity to edit any component of your evaluation while it’s still in draft.
### Evaluation dashboard
Once your evaluation has responses, the dashboard shows three tabs that contain:
* **Participants** — Each row shows participant name, participant ID,completion status, when task was submitted, and duration of tasks.
* **Tasks** — Each row shows a summary by participant of all tasks and/or responses to post-session follow up surveys.
* **Highlights** — Each row shows the annotation, tags, the participant name and ID, the task in which the highlight was created, the researcher that created the highlight and when it was created.
Evaluation submissions on the dashboard can be filtered by task or keyword, and identify the participants who answered and if applicable, how those participants answered the post-session follow-up questions.
### Reviewing submissions: Playback view
The platform includes built-in analysis tools for reviewing a participant’s submission:
* **Participant summaries** — How each participant responded across all tasks
* **Task summaries** — All participant responses for each task
* **Progress tracking** — Which participants have completed which tasks
* **Response versioning** — Track revisions and resubmissions
Select a participant's submission to open the **Playback View**, the core review experience for evaluations. It has several areas working together:
#### Video player
* **Main video** — The participant's screen or camera recording
* **Picture-in-Picture** — The participant's camera feed shows as side-by-side with their screenshare (showing their face and reactions while they work)
* **Playback controls** — Play and pause
* **Highlight mode** — Allows you to capture highlights in the video.
#### Transcript
Below the video, a synchronized transcript shows what the participant said during the recording:
* **Search** — Find specific words or phrases across the transcript
* **Auto-scroll** — The transcript follows the video playback position
* **Resizable** — Drag to adjust how much space the transcript takes up
* **Highlight mode** — Allows you to capture highlights in the transcript. Any highlights you make in the transcript will be reflected in the video bar and the Highlights tab \[insert link to Highlights].
#### Tasks
Under Tasks, you will see:
* The individual tasks completed by the participant
* Responses to post-session follow-up questions
* Highlights captured which will also be reflected in the Playback video
* If revisions have been requested and resubmitted, you can see the original and revised version and compare both versions
#### Progress bar with bookmarks
The video progress bar shows colored markers indicating where each task begins and ends. Select any marker to jump directly to that task's recording.
### Requesting revisions
If you need a participant to perform an evaluation task again to obtain improved data, you can request a revision for any individual task. Possible reasons for a revision request may include:
Possible reasons for requesting a revision include:
* Incomplete answers
* Missing/corrupt file attachments
* Misunderstanding of the questions
* Conflicting answers
* Not sharing their screen
Select the task you want revised and move it to a **Request Revision** status; the participant will be prompted to re-record that task. Once the revision is submitted, you can compare versions side by side in the same playback view.
### Tips
* **Always enable screen + camera** — Screen shows what they did, camera shows their reaction, audio captures think-aloud commentary. The combination is far richer than any single source.
* **Be cognizant of task length** — Longer tasks can sometimes lead to participant fatigue and lower-quality data.
* **Use the transcript search** — Instead of watching entire recordings, search for keywords related to pain points (e.g., "confused", "where is", "can't find").
* **Leverage task bookmarks** — Use the progress bar markers to jump directly to specific tasks instead of scrubbing through the whole recording.
* **Request revisions, don't exclude** — If a submission has issues but the participant did their best, ask for a revision rather than throwing it out.
* **Build a template library** — If your team runs similar evaluations often, save your rating surveys as workspace templates for reuse.
* **Pay attention to revisions** – If participants repeatedly struggle with the same task, don’t just request revisions. Consider whether the task itself needs clearer instructions or a different setup.
* **Don’t over-instruct** – Give participants enough context to complete the task, but avoid instructions that lead them toward a specific action or answer.
***
\
---
# Agent Instructions
This documentation is published with GitBook. GitBook is the documentation platform designed so that both humans and AI agents can read, navigate, and reason over technical content effectively. Learn more at gitbook.com.
## Querying This Documentation
If you need additional information that is not directly available in this page, you can query the documentation by asking a question.
Perform an HTTP GET request on the following URL with the `ask` and `goal` query parameters:
```
GET https://docs.pulselabs.ai/data-capture-tools/evaluations-task-based-research.md?ask=&goal=
```
`ask` is the immediate question: it should be specific, self-contained, and written in natural language.
`goal` is what the user is ultimately trying to achieve, the reason they need the answer. Sharing it helps GitBook give you a better, more relevant answer. A goal is most helpful when it describes the outcome the user wants rather than restating the question. For example, with `ask=how do I create an API token`, a goal like `automate deployments from our CI pipeline` lets GitBook tailor the answer to that use case.
The response will contain a direct answer to the question and relevant excerpts and sources from the documentation.
Use this mechanism when the answer is not explicitly present in the current page, you need clarification or additional context, or you want to retrieve related documentation sections.